Writing your first plugin
Are you looking forward to writing a plugin? The Developer's Guide will help you. Here is a list of steps you could follow:
- Understand the general structure of plugins.
- Develop your plugin, perhaps using Echo.js as a starting point. Refer often to this guide to learn about available features, and take inspiration from similar plugins.
- Test your plugin's functionality, both by yourself and with other users.
- Review our best practices and apply them to your plugin.
- If you wish, submit it into the main repository!
- Fork our repository on GitHub.
- Commit your changes, taking care to follow our coding standards which dictate rules on code formatting and commit messages.
- Open a pull request.
Architecture
This is an overview of the logic flow of messages:
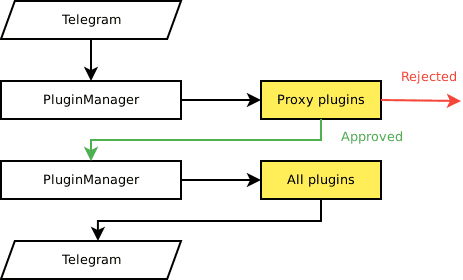
PluginManager receives Telegram messages, and passes them to the proxy plugins for inspection. If the message is approved by all proxies, it is sent to all plugins, which may decide to reply with a text, picture and so on by interacting directly with the Telegram API.
Plugins
In Nikoro, plugins are classes that react to specific events from the Telegram API.
The general structure is:
// File: src/plugins/MyPlugin.js
const Plugin = require("../Plugin");

module.exports = class MyPlugin extends Plugin {
  // Information about your plugin.
  static get plugin() {
    return {
      name: "MyPlugin",
      description: "It does things.",
      help: "Try saying 'Hello!', or using the /hello command."
    }
  }

  // Optional: initialize the plugin.
  constructor(obj) {
    super(obj);

    /* ... */
  }

  // Optional: stop the plugin.
  stop() {
    foo.stop();
  }

  /* Handlers can return a string, representing a text reply;
   * alternatively, they can return {type: "text", text: "..."} (see Telegram API);
   * alternatively, they can use this.sendMessage.
   *
   * The same goes for eg. pictures (either {type: "photo"} or this.sendPhoto),
   * music ({type: "audio"}, this.sendAudio) and so on.
   */
  onCommand({message, command, args}) {
    if (command === "hello") {
      return "Heyo!";
      this.sendMessage(message.chat.id, "Heyo!");
    }
  }

  // Called when a message is received.
  onText({message}) {
    if (message === "Hello!") {
      this.sendMessage(message.chat.id, "Hi!");
    }
  }

  onPhoto({message}) {
    /* ... */
  }

  /* ... */
}
As you can see, it is a class that extends Plugin (from src/Plugin.js). The metadata is given through static get plugin(), which must be present.
Every plugin must have static get plugin(), which returns an object. At a minimum, it contains:It can include additional properties, which we'll explain later:
- name: the plugin's name
- description: a short description (shown in the list of plugins)
- help: a help text (shown in /help PluginName)
- isProxy, which says whether this plugin has proxy capabilities or not (default: false)
- isHidden, which says whether this plugin is hidden from /help or not (default: false)
It optionally features a constructor, to give you access to rarely-used objects:
constructor gets passed a single variable (usually called obj), which contains the objects needed to initialize the plugin. They are:There are also some properties you shouldn't need:
- config: the bot's configuration
- auth: an instance of the Auth helper, documented later
- db: the plugin database loaded from disk (you shouldn't need it, it's in this.db)
- blacklist: same as above, but with the blacklist (this.blacklist)
- emitter: the emitter from PluginManager (can be accessed with onText, onMessage and so on)
- bot: the TelegramBot object from node-telegram-bot-api
It also features one or more event listeners, functions that react to events.
An example of event listener is:onText({message}) { // Your code here }
They are functions that are invoked whenever a specific event happens. They take an object argument with the property message.
There are many ways you can react to a message by eg. sending a text message:
- You can return a string: return "Hello there!"
- You can return an object with the type of message and its contents:
return {
  type: "text",
  text: "*Hello* there!",
  options: { // Optional parameters, see Telegram API
    parse_mode: "Markdown"
  }
}
Use "audio" for the API method sendAudio, "document" for sendDocument, "photo" for sendPhoto and so on. "text" is an exception, it uses sendMessage. Note that you can't send contacts or locations with this method.
- You can return a Promise that returns one of the above:
onCommand({command, args}) { const query = args[0]; return request("https://google.com/search?q=" + query) .then(text => "The result of your search is:\n\n" + query); } - You can use the Telegram API methods, documented below. For example, this.sendMessage(message.chat.id, "Hello!").
You can find a list of event listeners in src/Plugins.js; the general rule is that the listener takes the name of the event (text -> onText, photo -> onPhoto and so on).
Using the Telegram API
Nikoro exposes the Telegram API through node-telegram-bot-api, the methods of which are bound on the Plugin instance. In short, this means that inside a plugin you can simply call this.sendMessage(...) and it will work as expected.
Note that in function() { } blocks, this does not point to the Plugin instance, so this.sendMessage won't work as expected. You should replace them with arrow functions if you wish to use this.
Refer to the NTBA reference or its documentation for extended information on how to use it. Here are some of the most common cases:
// Responding to a message
onText({message}) {
  if (message.text === "Hello, bot!") {
    return "Hello, user!";
  }
}

// Italic/bold text
onText({message}) {
  this.sendMessage(message.chat.id, "__Italic__, *bold*", {parse_mode: "Markdown"});
  this.sendMessage(message.chat.id, "<i>Italic</i>, <b>bold</b>", {parse_mode: "HTML"});
}

// Sending a picture
onText({message}) {
  this.sendPhoto(message.chat.id, "/home/john/Pictures/paveldurov.jpg", {caption: "This is Pavel Durov."});
}
Note that sendMessage (like all send* functions) takes two arguments, the chat ID (or the user ID, if they already initiated a conversation with the bot) and the text.
Proxy plugins
Nikoro supports proxy plugins, i.e. plugins that can approve or reject messages. Approved messages keep going through the bot and plugins; rejected messages are dropped.
To configure a plugin as a proxy, simply set isProxy: true in static get plugin() and implement a proxy(eventName, message) method. It will receive every message, returning a rejected Promise (Promise.reject) if the message is rejected, and anything else otherwise.
The Auth helper
Sometimes, you may want to restrict the usage of a command to chat administrators, or viceversa you may want to apply a command differently for normal users and admins (eg. prevent admins from being kicked). For this, you can use the Auth helper, which has methods to determine whether a user is a chat administrator for a specific chat or an owner. You can get it via the constructor:
constructor(obj) {
  super(obj);

  this.auth = obj.auth;
}

onText({message}) {
  if (this.auth.isOwner(message.from.id)) {
    return "You are an owner!";
  } else if (this.auth.isChatAdmin(message.chat.id, message.from.id)) {
    return "You are a chat admin!";
  } else {
    return "You are not an admin, sorry.";
  }
}
It exposes the methods isChatAdmin(chatID, userID) to determine whether an user is a chat admin for the given chat or a (global) owner, isOwner(userID) to determine if the user is an owner per config.json, and getChatAdmins(chatID)/getOwners() to get an array of chat admin and owner user IDs respectively.
Testing
You can test your bot by simply writing to it on Telegram, of course. However, in some situations (eg. requiring multiple accounts) it can be tricky or time-consuming to do so. For this reason, you can use a "mock interface" in tests/cli.js.
It will run your bot in a fake environment, pretending to be Telegram. It will only receive your messages from the console, and the messages it sends are printed to the console. Furthermore, you can use the console to switch between different accounts and groups with a simple command.
For further information, send "#help" using the tool.
Best practices
This is a list of guidelines that plugins should follow in order to be enjoyed by users.
- Each plugin exists to fulfill one or more needs, be it a need for fun or for a tool. The plugin should fulfill the users' needs with the minimum number of steps, and possibly short interactions.
- Being able to fulfill a task in few steps is part of keeping it simple. This principle also means hiding the complexities of a system from the user, exposing a simple interface instead.
- Use structured input (buttons) when possible. This usually makes it as easy as possible to interact with the bot, since it reduces the possibilities to make mistakes.
- Enforce authorization checks. This can be as trivial as not letting a mod kick an admin, but can also be more subtle: for instance, if an action takes two or more steps, it shouldn't be possible for an user to initiate the action and another to continue it.
- Provide feedback for user's actions. For instance, if you're writing the Set plugin, you might want to send the user a confirmation:
User: /set Hello Hey there!
Bot: Set Hello => Hey there!Note that in this case, we're not just providing a confirmation, but we're repeating part of the input to confirm the action was understood correctly.
On the other hand, you shouldn't provide redundant feedback. For instance, if you ask the bot to change the chat title, Telegram will already display a notification, so you shouldn't send an additional message:
User: /settitle My favourite chat
Bot changed the chat title to "My favourite chat". - An important part of providing feedback is handling errors and informing the user of them. For instance, if you're writing a plugin to change the chat's title, consider the possibility that it doesn't work due to the bot not being an admin:
User: /settitle My favourite chat
Note that for Telegram API methods such as .setChatTitle, this is achieved with promises with a .catch(error => {...}) clause.
Bot: Couldn't set the chat title: not a chat admin. - Use this.log sparingly instead of console.log. This allows the bot's owner to stay aware of what their bot is doing, without being overwhelmed with messages. Choose levels accordingly: being unable to kick an user should be logged with this.log.error, but the user running a query on your plugin (eg. /google telegram bots) is worthy of this.log.debug at most.
- If you use a multi-step process, provide a way out. Users may change their minds or decide they "started with the wrong foot"; they should be able to undo the action, and not be stuck in the process.
- Use standard text messages. Currently, the only standard is returning Insufficient privileges (chat admin required). and Insufficient privileges (owner required). when a user lacks authorization to run a command.
- Differentiate between actions that can be run by anyone, commands that are only for chat administrators (because they can be disruptive to the chat, eg. kicking users), and commands that are only for owners (because they can disrupt the operation of the bot, eg. global settings, enabling plugins).